Many of you know that my Husband & best friend in the whole world had Gastric Bypass at the end of December. With it are all kinds of obstacles, big and small. It was a big risk to make. But he made it for us! His family. We love him, support him and are so incredibly proud of all that he has accomplished!...We decided a party was in order!
TROPHY HUSBAND PARTY!
I invited our closes friends and family to join us for a bonfire to celebrate the beginning of summer and under the disguise that I wanted them here to share my birthday as well. At least that is what I told Tim! lol. I had been preparing this party for MONTHS in my head. This brain was full of so many ideas, some I found from inspiration in other parties, some of my own. He was clueless until about 20 minutes before we were expecting company. Here he is after he JUST realized what was going on.
Here is what he found!
THE SPREAD. We were in the back yard, and the garage was the back drop. I see now i needed something more colorful for the background so the banner would show better. But it was late in the game. Oh well, now I know for next time!
THE BANNER: term I use loosely. I just painted chipboard letters in black and white. Very sloppy. I wanted it to take on a tarnished pewter look, like a trophy. So I literally dipped my pain brush in both blackand white at the same time and just slopped it all on. Wrapped with copper wire and considered it done!
MOOD LIGHTING: I bought these old rusty springs at Junk Jubilee in DesMoines this spring, for this exact reason. Dropped in a couple of small jelly jars and a tealight, hung them by copper wire!
CUPCAKE TOPPERS: I want to appologize right now, I know I found the download online somewhere, but for the life of me can't find it now. If its yours, please leave a comment and I would love to give credit! I did edit it a bit to show the date we got married. 1998. wow, 13 years already. dangaloo! oh, and remind me to share the recipe for those cupcakes. SUPER easy, Low on Points for those on weight watchers and soooo delish!
KEEP CALM: Hahahahaha! This sign cracks me up. I think I found it by googling signs for men or something of the sort. Scarey thing, is that I'm pretty sure that Tim has said this, or something very similar at some point in our relationship. Yeah...I'm just that lucky! lol
COOLTOWN: Ok, another fantabulous sign. This will remain framed and in the basement in his mancave. Lucky for me, he doesn't sport the mullet. However, I did hear more than one comment about the sign and refrences to past boyfriends or long lost family members! What a hoot!
SMORE'S FIXIN'S: Another google search produced these fabulous pictures for the marshmallow stabbers! Love the retro look to them!
And who coulf forget the TROPHY?
Oh wait...thats not him.....let me look again
There he is! Amazing he is! Down 135lbs since December 22nd. And he's not done. And even without the weight loss...he's an amazing man, amazing father, amazing friend, son, brother. I'm sure I've forgotten something else he's incredibly awesome at. But he truley is a Trophy Husband!
Tuesday, June 7, 2011
Wednesday, March 9, 2011
Somewhere over this Rainbow!!!
I can't believe that our Becca is 5! Sooo much I could say about this little girl, but words just wouldn't do it justice! I did however, want to style a perfectly bright and cheerful party, that would make you smile, just as much as she brings a smile to everyone's face that meets her!
Guests were met with Rainbow Balloon Wreath! WE recived sooooo many compliments about this wreath. I have to tell the truth. It was up for about a week before the party, and neighbors stopped to tell us how much they loved it!
Rainbows Rainbows EVERYWHERE! I used the bay window as the presents staging area and of course it needed to be topped with ROYGBIV!
The Birthday Banner!
Style me Rainbow!
Rainbow Wands for everyone! Made of simple dowel rods and ribbons...what little girl doesn't want to dance around with one of these?
The kids craft table had a rainbow assortment of bubbles to add to the take home bags. We also painted each child's initial and made sand art bottles!
The food was a huge assortment of sweets...and of course this momma thought a little selection of fruits and veggies were necessary as well. To my surprise, fruits and veggies went first! Rainbow Cake (both inside & out), white chocolate dipped marshmallows (with sprinkles...which make everything better), giant lollipops, gel-dyed sugar cookies, Skittles, veggies, fruits, and water bottles!
Last I heard...allllllll kinds of dreams come true! Happy 5th Birthday Becca!
Linking to the following blog parties! Check them out by clicking on the buttons and seeing all the fabulous work thats been done!
Monday, January 10, 2011
Fresh Start
My goodness! As much as I love the holidays, decorations, cheer and hustle and bustle, I was sooo over it much earlier than normal this year! So, needless to say, Christmas came down as soon as I could find the time...which still wasn't as early as I wanted it to be! Then it took me longer to normal to take it down after my Grandpa Don passed away and family dropped everything to do what we could from 1400 miles away!
I've been so inspired by Donna's style of natural, unfished or weathered textures over at Funky Junk Interiors, that I wanted to add a little of my own. I started with our entry that has been a little empty and not quit finished as I have envisioned since we moved in last fall. Here is a picture after the move and the addition of our monogram!
There was absolute Z.E.R.O. change made from that time last November, to this Christmas! So many other areas of the house to pay attention to! However, I added a bit at Christmas time with these super deals I found at target the day after Christmas last year! The pre-lit tree was on clearance for $14 and the large red tub for $12! That makes this girl happy!
I made the garlandfor the tree myself with just some cream embroidery floss, 1" punch and some two sided tape! Super simple and was easy to do infront of the tv!
This weekend however, I was able to gather some of my favorite pieces and
make a small natural vinette!
The large crate on the floor is something I snagged when a local grocery store when out of business. Picked a couple of the best ones that weren't rotten on the bottom and added some antique glaze too it to darken it up a bit. The lantern on top was the same one that housed aqua and silver christmas balls durring the holidays here. The other crate on the floor is a Planter's Peanut crate. It is completel closed up, never opened....except by the mouse that gnawed its way in. I should take a picture of the hole!
The egg print might be a litte springy for January, but I needed something that was neutral but heavy enough to balance everything. My husband's fishing hat joins the group in the upper left hanging from the coat hooks.
The two light green architechual pieces came home with me from a fabulous store in downtown Des Moines. I added an iron scroll piece to one and a chipboard stencil to the other. I put several layers on the chipboard to help it appear bronze like the frame and letter N below it. I think it turned out pretty swell if I do say so myself.
I'm very happy with it and even then spread the love to the livingroom bay window!
Natural makes me happy!
Saturday, November 27, 2010
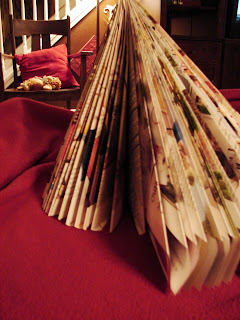
Upcycled Magazine to a Christmas Tree!
So I was flipping around the internet and came across a video of Martha (yes that Martha) making Christmas Trees by recycling magazines! Hmmm. I sat and awe at the ease of this project (although time consuming) and decided I would use up one of the hundreds of magazines laying around.
This is a close up of the finished project, with the tutorial following! I will take a daylight photo and add it tomorrow!
Here is a prep-step: Bend the spine of the magazine so that it loosens up a bit. Push the pages back a couple at a time so that the book doesn't automatically close on you anymore. This will help your tree be full all the way around.
Step One: Starting with the cover, take the upper right corner and bend down and towards the spine. Continue through the entire magazine.
This is a picture of a completed step 1 on all pages. A big bushy tree.
Step Two:
The long edge of your angled page needs to be brought towards your spine again. Crease well.
Step Three
Turn your page (as shown below)
Take the extra piece at the bottom (I have no technical term for this floogy, other than floogy and then Im not even sure how to spell said term) and fold it up into ad under the previous folds.
Here is what it should look like after all folded in.
This shot was taken 1/2 way through the magazine on step 4!
Next, I sprayed it with my favorite Catalina spray paint and doused it with silver glitter. It took about 3 coats of spraying to cover. However I was honestly tempted to stop at just 2.
I hope you enjoyed the tutorial! Give it a try. This is a great project to complete while sitting infront of the tv!
Monday, November 22, 2010
Its beginning to look a lot like Christmas!
Last week I slowly got out my tabletop decorations and spread a little Christmas cheer around my house. *disclaimer...don't ask my husband...he's a grinch!*
Here's a bit of what I did! The tree is going up this week!
I made a flag bunting with some scrapbook paper and ribbon I had on hand. The picture is a little dark. Which is exactly why the entertainment center needed something ele. Its a dark walnut stain against a dark brown wall which was the previous owners choice. I like it one my one wall, but in time I hope to change the wall color. There are lights in the towers on the sides, however because there is mirror in it as well, it was better for picture taking to have them off.
Here is my hutch in the dining room. I'm forgoing the traditional green with red and sticking with my white, red and blue that is in the rest of the house. I love this. The snowman plate gives me the vintage/retro feel that I want to lean towards in my kitchen and dinningroom.
The large lantern on the antique school desk was gift I received last year. I knew immediately I was going to fill it with clearance christmas ornaments that I got at 75% off the day after Christmas last year. All those balls for only $5. Love it.
Ok, confession. This is not a Christmas decoration, and not new to the livingroom, but it realy pops against the white on the shutter tha my dad made into a flower box for me.
The 3 ceiling tins needed something additional to add more contrast. Added this old (and rather ratty) wreath and added some white to it as well for just more texture.
And this is my entry tree. Just a little bitty one, but again, got for 75% off the day after Christmast last year. Great buy for just $7.50 prelit! I placed it in a large read metal tub I found on clearance a couple of months ago in the kitchenware section at Target. Placed an old stained cream table cloth around the base of the tree and made my own garland (tutorial coming). Had to include both daylight and night time captures here! lol.
Hope you enjoyed! Stay warm and dry and watch for a tutorial on a couple more christmas projects!
I've linked to the following parties! Check them all out! Lots of ideas and inspiration out there!
Subscribe to:
Posts (Atom)