Saturday, November 27, 2010

Upcycled Magazine to a Christmas Tree!

So I was flipping around the internet and came across a video of Martha (yes that Martha) making Christmas Trees by recycling magazines! Hmmm. I sat and awe at the ease of this project (although time consuming) and decided I would use up one of the hundreds of magazines laying around.


This is a close up of the finished project, with the tutorial following! I will take a daylight photo and add it tomorrow!

Here is a prep-step: Bend the spine of the magazine so that it loosens up a bit. Push the pages back a couple at a time so that the book doesn't automatically close on you anymore. This will help your tree be full all the way around.

Step One: Starting with the cover, take the upper right corner and bend down and towards the spine. Continue through the entire magazine.


This is a picture of a completed step 1 on all pages. A big bushy tree.

Step Two:
The long edge of your angled page needs to be brought towards your spine again. Crease well.


Step Three
Turn your page (as shown below)


Take the extra piece at the bottom (I have no technical term for this floogy, other than floogy and then Im not even sure how to spell said term) and fold it up into ad under the previous folds.


Here is what it should look like after all folded in.


This shot was taken 1/2 way through the magazine on step 4!
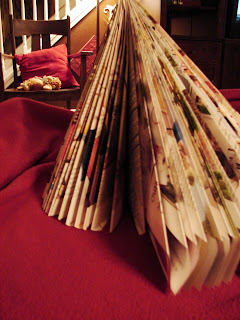

Next, I sprayed it with my favorite Catalina spray paint and doused it with silver glitter. It took about 3 coats of spraying to cover. However I was honestly tempted to stop at just 2.


I hope you enjoyed the tutorial! Give it a try. This is a great project to complete while sitting infront of the tv!

Monday, November 22, 2010

Its beginning to look a lot like Christmas!

Last week I slowly got out my tabletop decorations and spread a little Christmas cheer around my house. *disclaimer...don't ask my husband...he's a grinch!*

Here's a bit of what I did! The tree is going up this week!


I made a flag bunting with some scrapbook paper and ribbon I had on hand. The picture is a little dark. Which is exactly why the entertainment center needed something ele. Its a dark walnut stain against a dark brown wall which was the previous owners choice. I like it one my one wall, but in time I hope to change the wall color. There are lights in the towers on the sides, however because there is mirror in it as well, it was better for picture taking to have them off.


Here is my hutch in the dining room. I'm forgoing the traditional green with red and sticking with my white, red and blue that is in the rest of the house. I love this. The snowman plate gives me the vintage/retro feel that I want to lean towards in my kitchen and dinningroom.


The large lantern on the antique school desk was gift I received last year. I knew immediately I was going to fill it with clearance christmas ornaments that I got at 75% off the day after Christmas last year. All those balls for only $5. Love it.


Ok, confession. This is not a Christmas decoration, and not new to the livingroom, but it realy pops against the white on the shutter tha my dad made into a flower box for me.


The 3 ceiling tins needed something additional to add more contrast. Added this old (and rather ratty) wreath and added some white to it as well for just more texture.


And this is my entry tree. Just a little bitty one, but again, got for 75% off the day after Christmast last year. Great buy for just $7.50 prelit! I placed it in a large read metal tub I found on clearance a couple of months ago in the kitchenware section at Target. Placed an old stained cream table cloth around the base of the tree and made my own garland (tutorial coming). Had to include both daylight and night time captures here! lol.

Hope you enjoyed! Stay warm and dry and watch for a tutorial on a couple more christmas projects!

I've linked to the following parties! Check them all out! Lots of ideas and inspiration out there!
The DIY Show Off

Wednesday, November 17, 2010

Book Bags for Sprout Preschool!

I've been busy with a lot of organizing bookfairs, fundraisers an event I will be holding called Kids Night Out and now book bags! In the weeks since surgery this is how I have assumed my pose! lol. This is my life. Foot up, wrapped and itchy! Laptop near buy and either crusinin this wonderul web for inspiration, or keepingup with by besties!

So yesterday I finalized my design that would be stenciled on the canvas bags and today, while my punk was at school...got busy!


I started with the "Sprout" which is the logo of our church's preschool...by the same name! I wanted to incorporate our logo in with installing the love of reading into our children. Here is what I came up with just on Microsoft Word because I don't have any of the fancy photo editing software. Old school I tell ya!


I got out my freezer paper which I've been hearing all over blogland works like a charm for making stencils. I traced my pattern, then using a craft knife carefully cut it out!


I used my iron on a cotton setting to adhere the freezer paper shiny side down to the canvas bags, then proceeded to paint on the fabric paint!


10 Bags later, here they are!


I'm very happy with them and believe they will be a fun addition to the classrooms at Sprout Preschool!

Monday, November 1, 2010

I was featured!

What a wonderful suprise and honor to hear from Rachel at http://www.oneprettything.com/ That my Enchanted Forest Baby Shower would be featured on her latest baby shower round up!
Yesterday was the day! Mark it...Sunday, October 31st...I made it big! Ok...tiny lie. Tiny exagerated. Tiny wishes I suppose! lol, but hey! I will take what I can get!

Thank you, Rachel for featuring my post! For everyone else, you simply must go to
http://www.oneprettything.com/ and check out all the amazing talent oozing from all the features! I'm honored to be in such company!

Kids Night Out !

Quick note: The bunion on my right foot surgically removed last Thursday. For the mean time...I'll be sitting on my back side for the next 4-6 weeks. yep...this is me


I will say that means a lot of frolicking around this web of amazing talent and fabulous finds to get inspiration and of course Christmas ideas! I really should have no excuse for not getting any amount of crafting and party styling done in the next few weeks.

I am taking on yet another adventure of loving what I do and doing what I love!
I'm so enjoying styling parties, that I can't get enough. Literally. After the last one, Tim says, " no more projects, no more parties. Rest and rejuvenate! "
Although I must say it all sounded nice...I kinda laughed and rolled my eyes at him too!

Within a week, I have found not only a project, but a project involving a party!


KIDS NIGHT OUT!
I will be hosting an evening for children with themed activities, crafts, snacks and games. It will be sooo much fun! For 5 hours, the kids will hang out with me, keeping busy and have a blast, while their parents are out running errands, having date night, girls night, poker night, renovation night...whatever they want to get done without having the kids underfoot! If you are in the area and would like your children to have a great night...message me and we'll get them signed up for December 6th! Our first event!

So...with that said...I have to get busy with finding activities, games, crafts and take homes for the kids to keep busy with!

I'm so excited about this! I hope you are too!